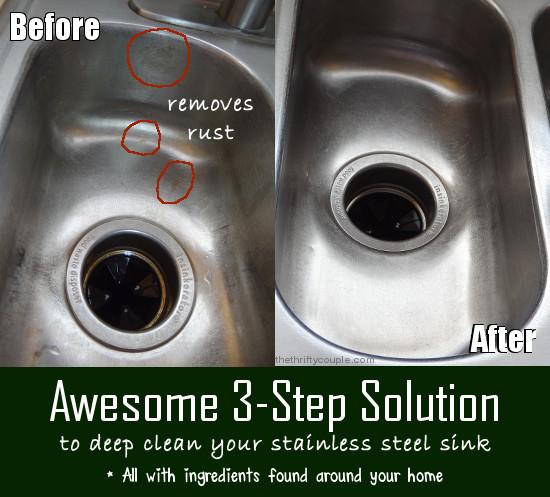
Are you ready to combat the chrome and get geared up to defeat the grungy stainless steel sink? Well, we want to share with your our 3-step process on how to clean a stainless steel sink and the best part is, there are no expensive cleaners – only simple ingredients found at home already!

I love this method as you walk away with it looking like a brand new sink. Mine is 10+ years old, has plenty of scratches and dings. I can’t say that I treat my sink nicely, as I don’t. I work it hard, things get thrown in, things get left sitting in… etc. It is a well used kitchen appendage! So it is always a joy to see how she shines and the smile on her face after this great cleaning – it’s a day at the spa for her. 🙂
So let’s get this party started and get our sinks clean with a few minutes of work and a few ingredients. Think of this as like a car wash – the supreme wash with the cleaning, buffing and spot-free rinse, and the waxing!
Well, that’s what we are going to do.
Step 1 for Stainless Steel Sink Cleaning

Supplies:
- Vinegar
- Baking Soda
- Dish soap
- Scrubbing tools like toothbrush, scrubby pads/sponges and steel wool
How to clean stainless steel sink step #1
- Plug the sink(s)
- Then add about a 1/2 inch of water
- Sprinkle baking soda all around
- Squirt some dish soap in the sink all around

Big sink with this solution

Small side sink with the solution
- Then pour distilled white vinegar into the sinks and let the solution “bubble up.”

Bubble Fest!

- Then let this sit for a minute or two.
- Go through and scrub away with your scrubby pads and steel wool. When using steel wool, gently scrub and it will also help buff away some superficial scratches (but do this carefully as you can create other scratches :))
- This is also the time I use a toothbrush to get the crevices by dipping the toothbrush in the solution and scrubbing the outside parts of the sink.

- Then when you are satisfied, pull the plug to drain and rinse the residue away.

The dirty water left from scrubbing the small side of my sink – this is evidence it works well 🙂
Here’s the results after step #1 of stainless steel sink cleaning. My camera does not do this justice. In person, the difference already is amazing!

After Step #1 of 3-Step Stainless Steel Cleaning – already a big difference!

Step 2 of Stainless Steel Sink Cleaning
This is what you might consider your spot removal and spot-free rinse step.

Supplies:
- Cream of Tartar (buffer and scratch reducer)
- 3% Hydrogen Peroxide
- Rubbing Alcohol (optional)
Read more : 20 Ideas for Making a Small Kitchen Look Bigger
How to clean stainless steel sink step #2
- Sprinkle the cream of tartar over the sink. This will help to buff and smooth out small scratches.
- Then spray with the Hydrogen Peroxide – when you turn on the water after buffing, then this will create a “spot-free rinse”
- Simply take your scrubby pad and “buff” the sink by working in a circular motion.

- Then turn on the water and rinse away. Feel free to spray a bit more hydrogen peroxide if you need to!
- For this step, if you have rust or other spots, you may need to go a step further in removing the rust.

- This is best done with straight rubbing alcohol on a rag or scrubby pad. Just pour a bit of it on and scrub away the rust/tough stains BTW – this is a before all of the steps picture. I often find that the rust will fade after completing step #1 and #2, so you couldn’t see it in the camera, so I am showing rust from first picture so you can actually see it. However, even after the first 2 steps, there is still a bit of rust visible in real life – so this is when you might need to pull out that alcohol!
Step 3 of Stainless Steel Sink Cleaning
This is what you might consider your shammy shine/waxing when you wash your car! Well, we want that stainless steel to shine as well! This also gives your sink a bit of nourishment.
Supplies:
- Olive oil or baby oil
- A rag
To finish up, I will use a towel to dry it up and then give it a nourishing shine with oil! Olive oil or baby oil is best. Simply pour oil on a rag and wipe down the sink.

Then your sink will shine and be happy and you will be too!

Here’s the before and after next to each other so you can see the awesome difference. Again, camera’s (and my poor photography skills) do not give this justice, but it is beautiful instead of a dull stainless – it’s shining!
*One final note, you may have noticed my sink, an extra big sink with a small sink instead of it being divided in half. Let me just say I HATE this sink design. It looks like it would be quite cool and functional – but the truth is…. the small sink is useless! You can’t wash dishes and rinse reasonably without water going everywhere, it is too small for holding strainers and cleaning food (which is why I get a lot of buildup on the edges as seen in the toothbrush picture – the water always leaks out over the sides!), water not only spills over the counter tops, but onto the floor and has been a real pain. If you have a choice, I would recommend not going with a sink like this. When I change one day – I will steer clear of this useless design.
See more specific Cleaning Tips HERE
See our Cleaning Pinterest Board HERE
Source: https://gardencourte.com
Categories: Kitchens


