Home House & Components Rooms Porch
Updated: Feb. 24, 2023
You are watching: How To Build a Double-Duty Pub Shed
Project Directions:
1. Lay the Foundation
 Family Handyman
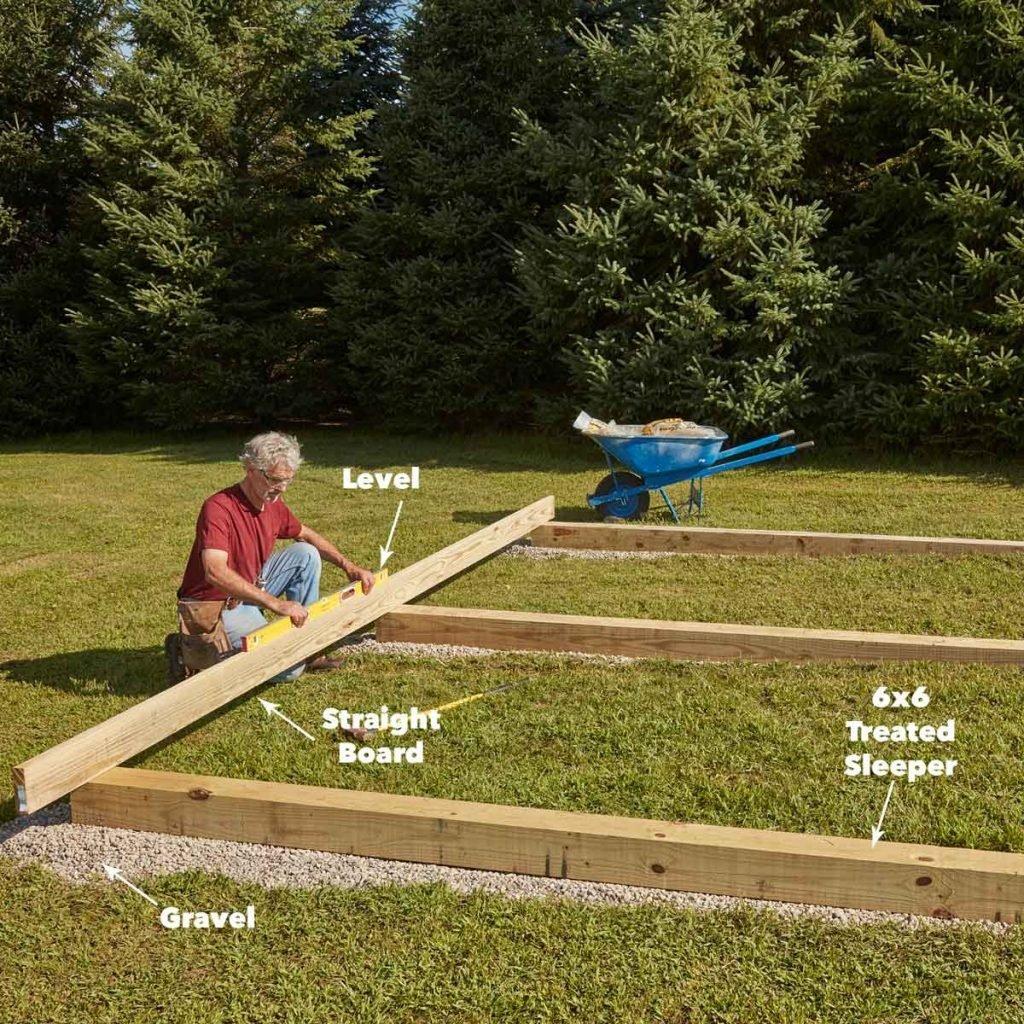
As we’ve done with many of our recent sheds, we built this pub shed on a wood floor supported by treated 6x6s. But you could substitute a concrete slab or provide footings or another type of support for the floor joists.
Start by laying out the perimeter of the shed. Use stakes and a string line, or a rectangle built with 2x4s to represent the outside edges of the 12- x 16-ft. floor. Now measure in 8-3/4-in. from the short sides and drive stakes to mark the center of the trenches. Drive a third pair of stakes to mark the center beam.
Dig trenches about 12 inches wide and about 10 inches below where you want the bottom edge of the joists to end up. Pour four inches of gravel into the trenches and level it off. Make sure the gravel in all three trenches is the same height. Then cut the 6x6s to 12 feet long and set them in the trenches.
Measure to make sure the 6x6s are parallel. Then measure diagonally from the ends of the outside 6x6s to make certain they’re square. The diagonal measurements should be equal. Finally, level the 6x6s. (See photo above and Figure B in the project pdfs. To access Figures B through V, click on the pdf link at the end of this story.)
2. Square the Floor Frame
 Family Handyman
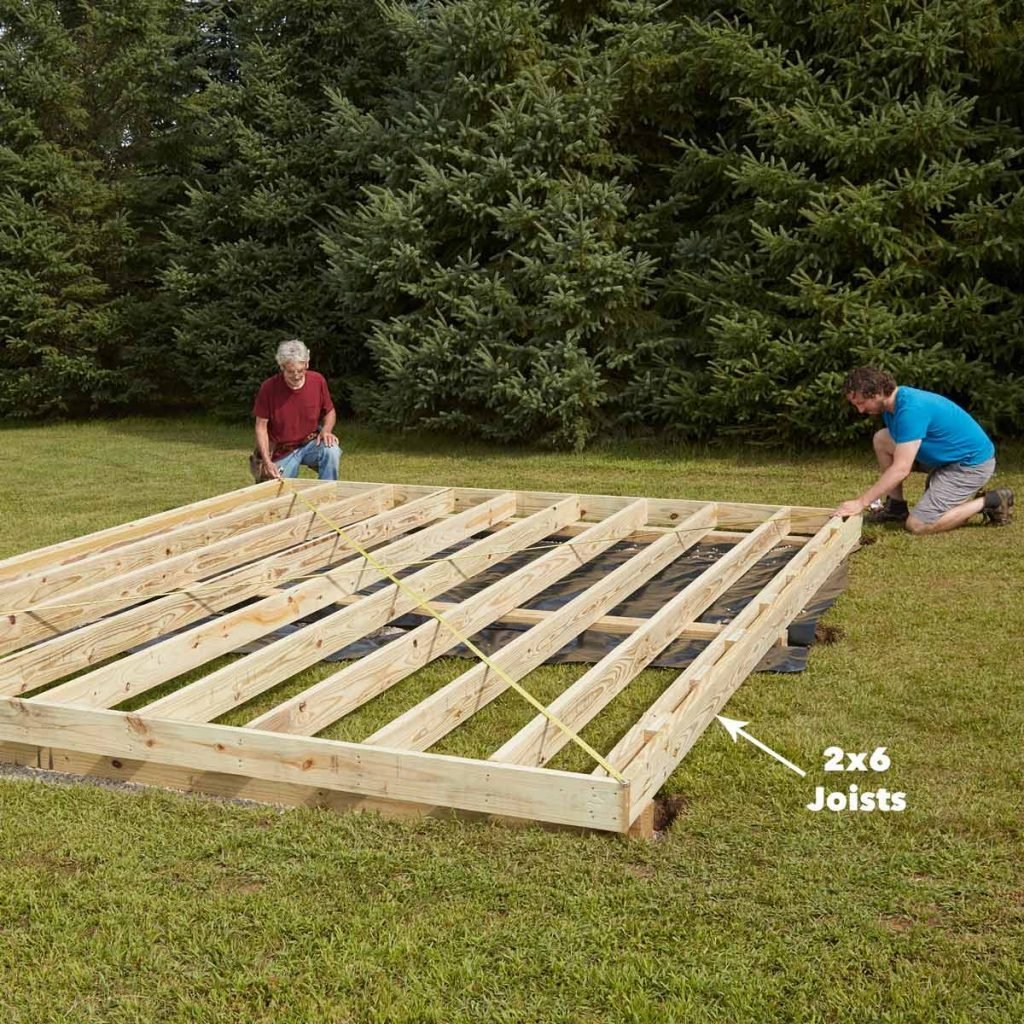
Next, frame the floor with 2x6s. Start by cutting the 12-ft.-long rim joists for the front and back and marking the joist locations. Cut the joists and nail them to the rim joists.
When you’re done, square the joists (photo above). Use a taut string line or sight down the 12-ft. rim joist to make sure it’s straight. Then drive toenails through the joists into the 6x6s to hold the joists in place.
3. Install the Flooring
 Family Handyman
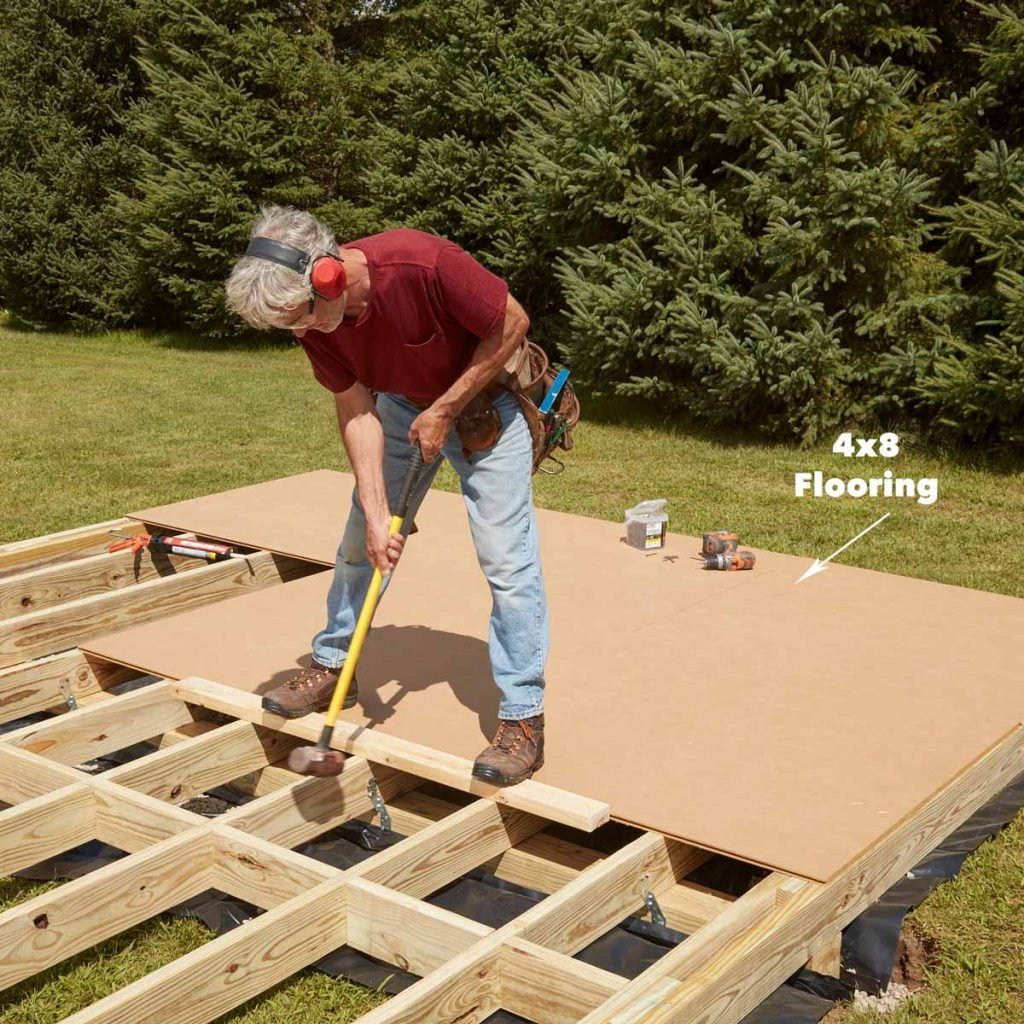
We chose tongue-and-groove LP ProStruct Flooring with SmartFinish for the shed floor.
Fasten the first sheet in the back corner with construction adhesive and deck screws. Finish the row with a half sheet. Then start with a full sheet from the opposite end so the seams between sheets are staggered.
The photo above shows how we installed the flooring. Learn more about how to install flooring here.
4. Build the Walls
 Family Handyman
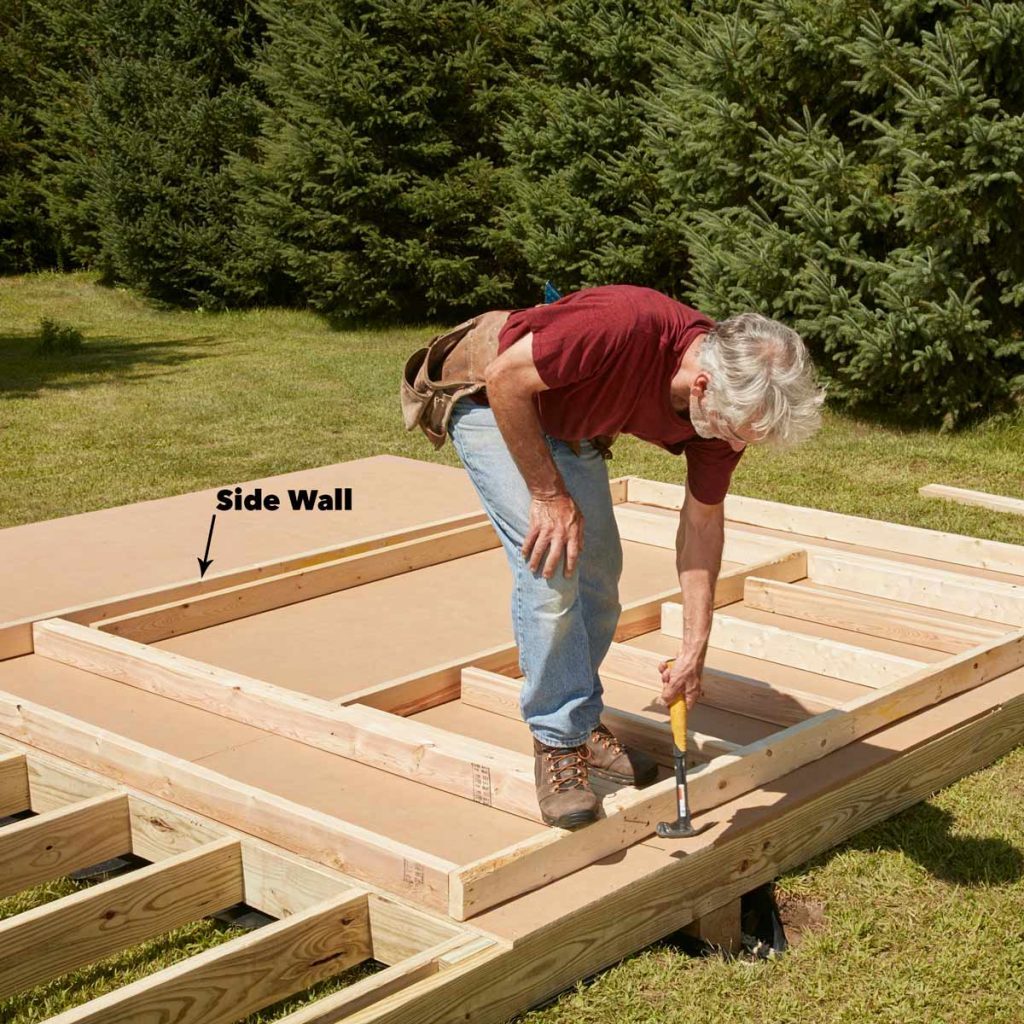
Using Figure C as a guide, chalk lines on the floor to indicate the inside edges of the walls. These lines provide a reference for straightening the bottom plate of the walls after the walls are standing.
Cut the top and bottom wall plates and mark the stud locations on them (Figures D through G). Build the side walls (photo above) of the pub shed. Then build and stand the front and back walls. Brace them temporarily.
5. Plumb and Brace the Walls
 Family Handyman
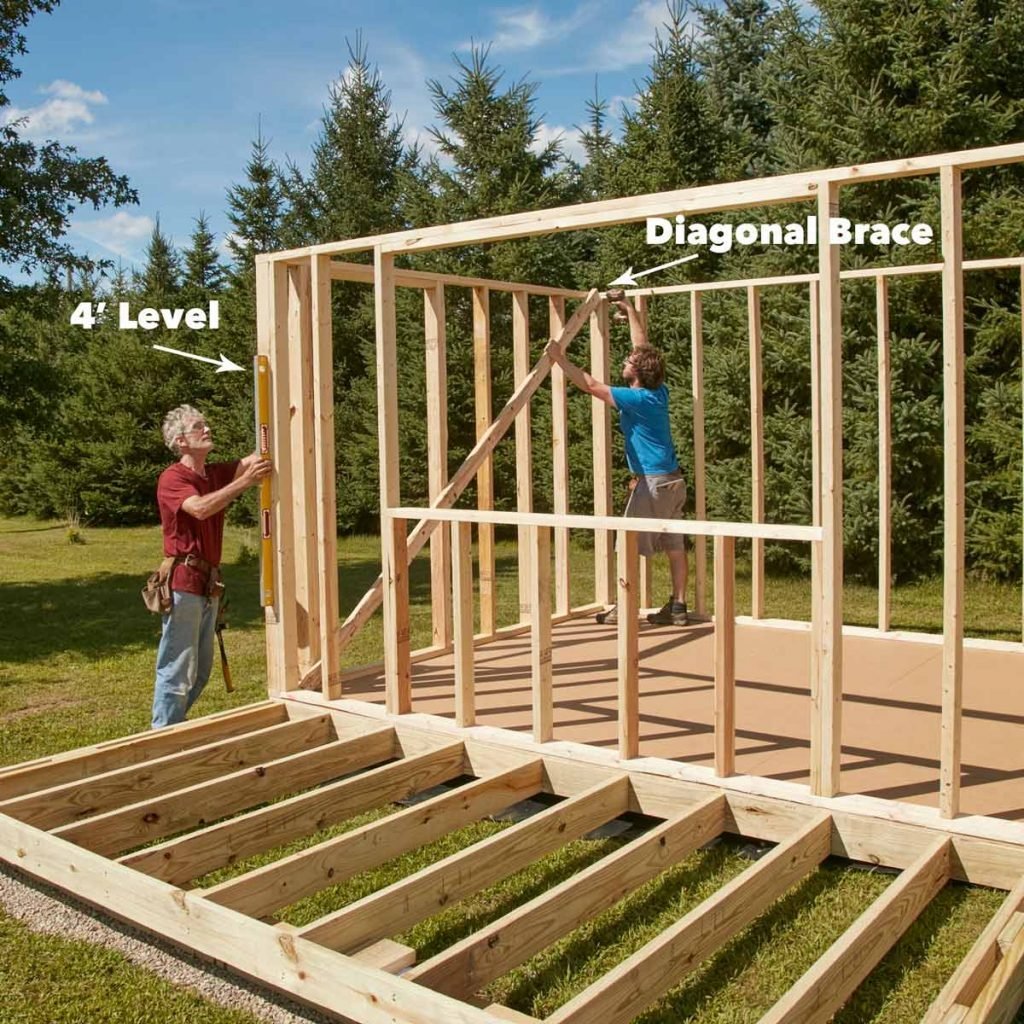
After nailing the walls together at the corners, install temporary diagonal braces on the inside to hold the walls plumb (photo above). Make sure the walls are firmly nailed together at the corners. Then use a level to plumb the corners while you attach temporary diagonal bracing to the inside of the walls.
Brace all four walls. You can remove the bracing after you install the siding panels.
6. Fasten the Plates Over the Posts
 Family Handyman
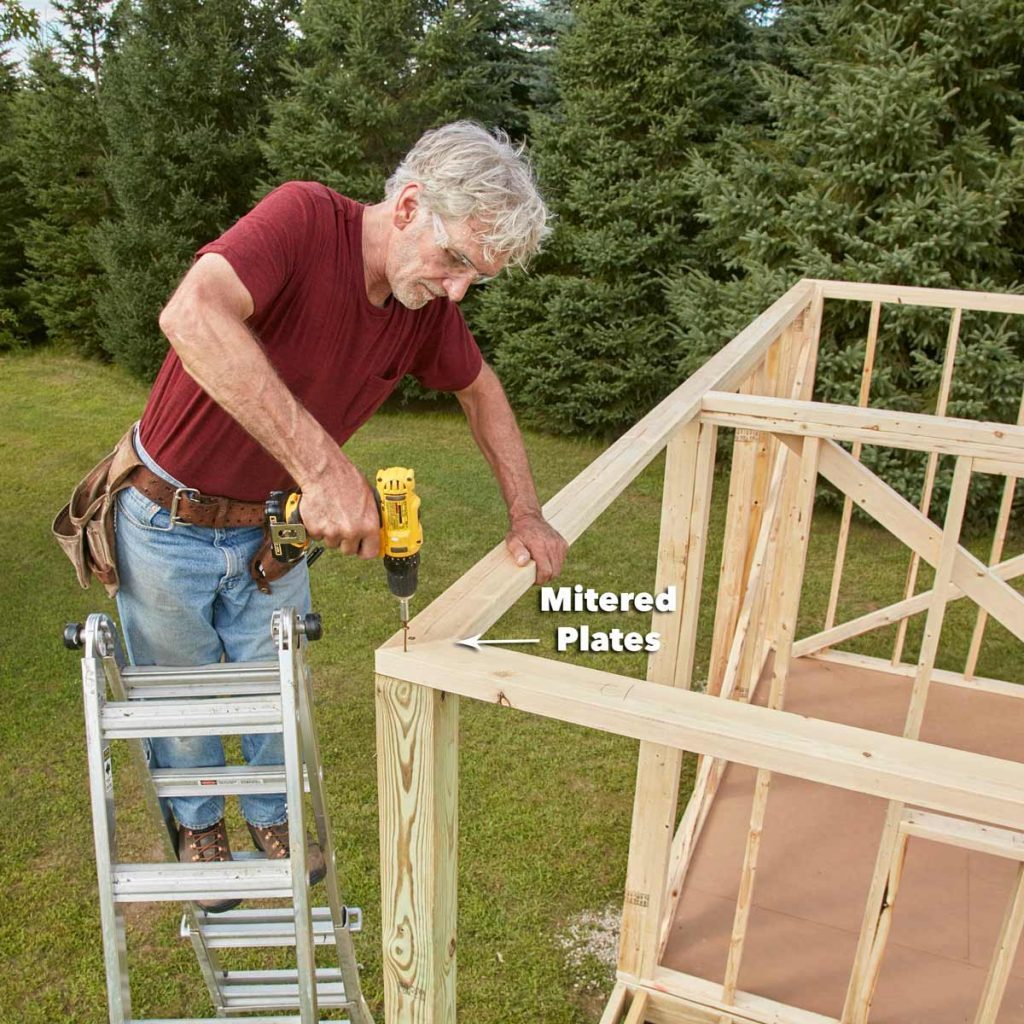
Two 4×4 posts at the front of the shed support the front half of the roof. Secure the bottom of the posts to the deck frame with metal post anchors. Tie the top of the posts together with the second (top) 2×4 plates that run over the top of the walls. Miter the ends of the 2×4 plates over the posts and attach them with screws (photo above).
7. Install the Decking
 Family Handyman
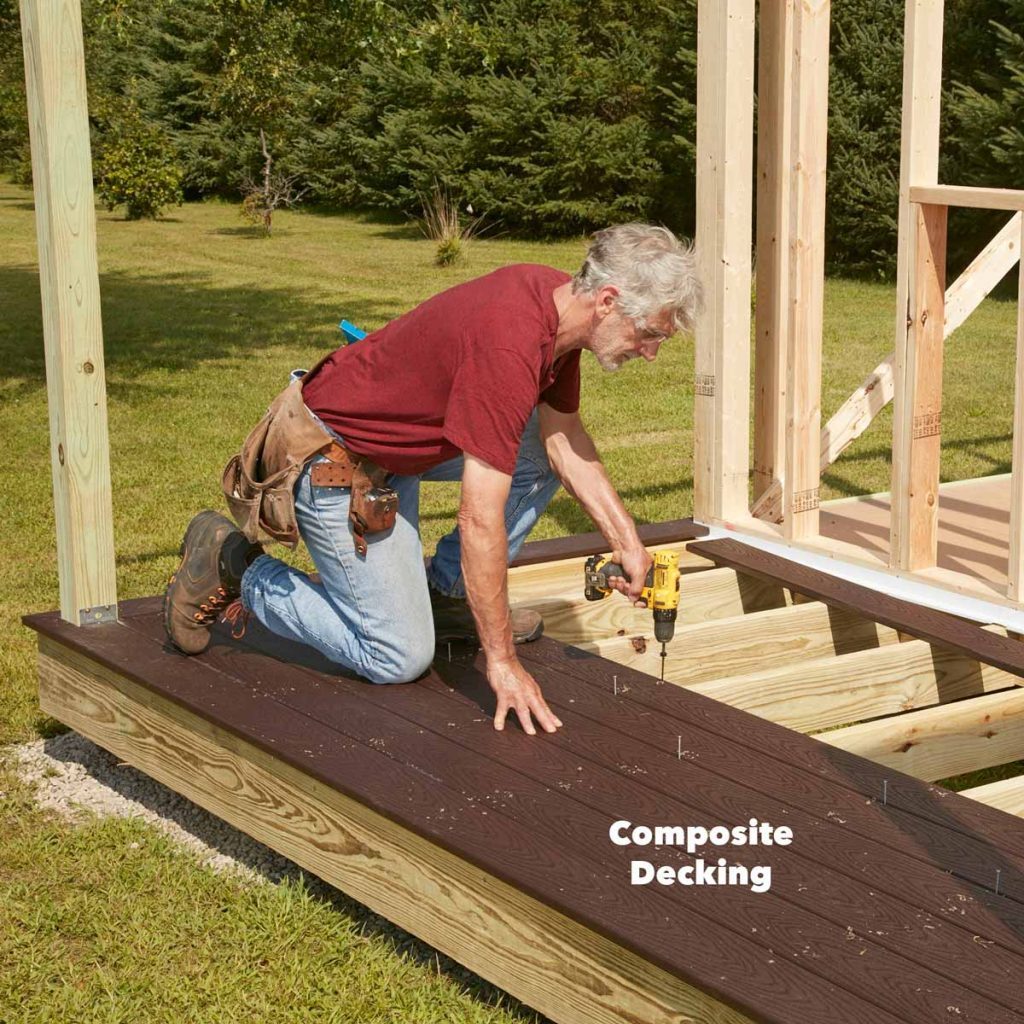
Start by cutting and installing the perimeter boards. Leave a one-inch overhang. Notch and miter the perimeter boards to fit around the post. Then space the remaining deck boards with a 16d nail and screw them to the joists.
We used the Cortex hidden fastener system (see Figure M).
8. Set the Ceiling Joists
 Family Handyman
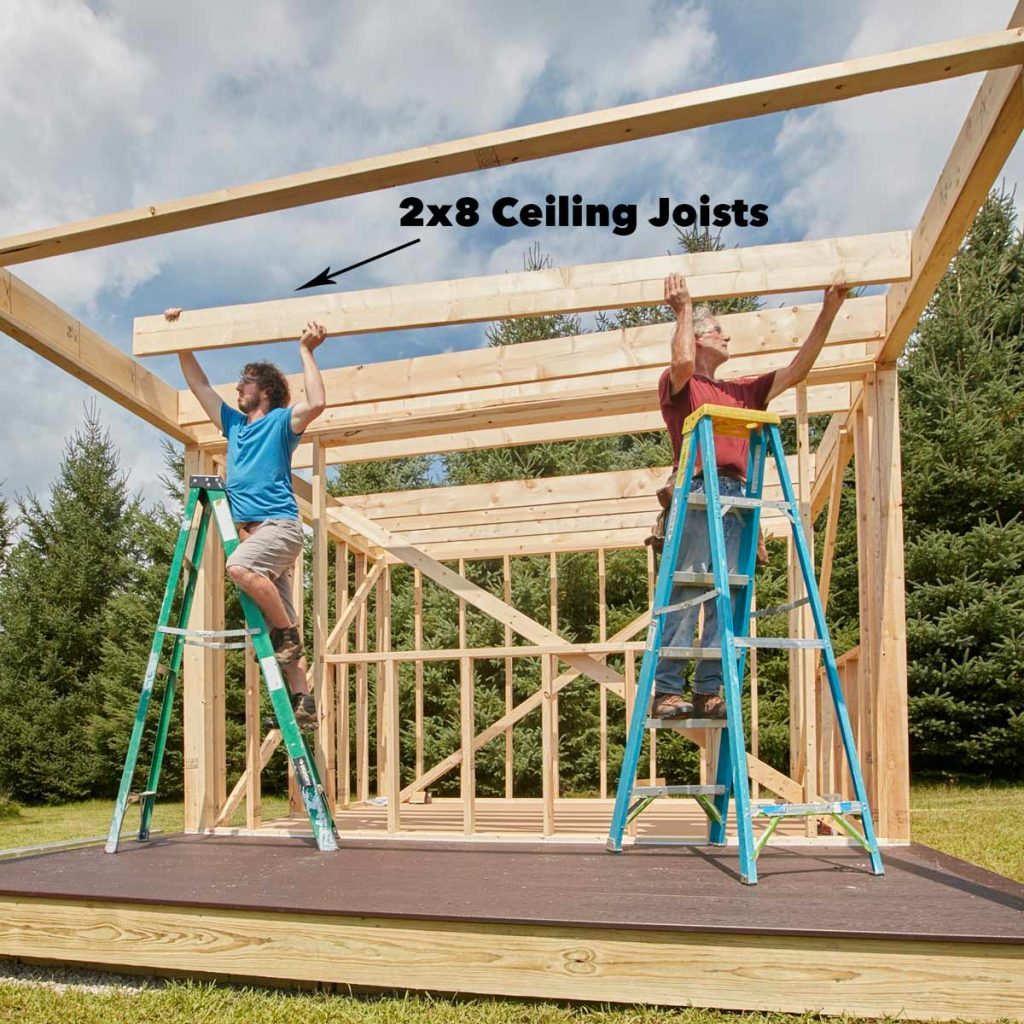
After installing deck boards on the front porch, build the attic floor. The 2×8 joists covered with sheets of flooring material provide storage space in the attic. We left a 4-ft.-wide opening for easy access to the front and back loft areas, but you could also cover the entire area with a floor and provide an access door or pull-down ladder instead.
Read more : How To Keep Bugs Away From Cat Food!(27 Amazing Ways)
Start by marking the joist locations on the two side joists using Figure H as a guide. Then cut and install the joists (photo above).
Mark the joist locations on two rim joists and nail the rims to the top plate. Make sure they are set in 1-1/2-in. from the outside edge of the wall to allow space for the second rim joist. Attach the joists with screws or nails driven through the rim joists. Then add the second rim joist and install joist hangers on every joist.
Before you cover the joists with the 4 x 8-ft. sheets of flooring, plumb and brace the 4×4 posts with diagonal 2x4s. Also stretch a string or mason’s line from front to back along the top edge of the outside joist to make sure the walls and joists are straight. The attic floor needs to be square with straight sides. If not, the rafters won’t fit correctly.
9. Side the Walls
 Family Handyman
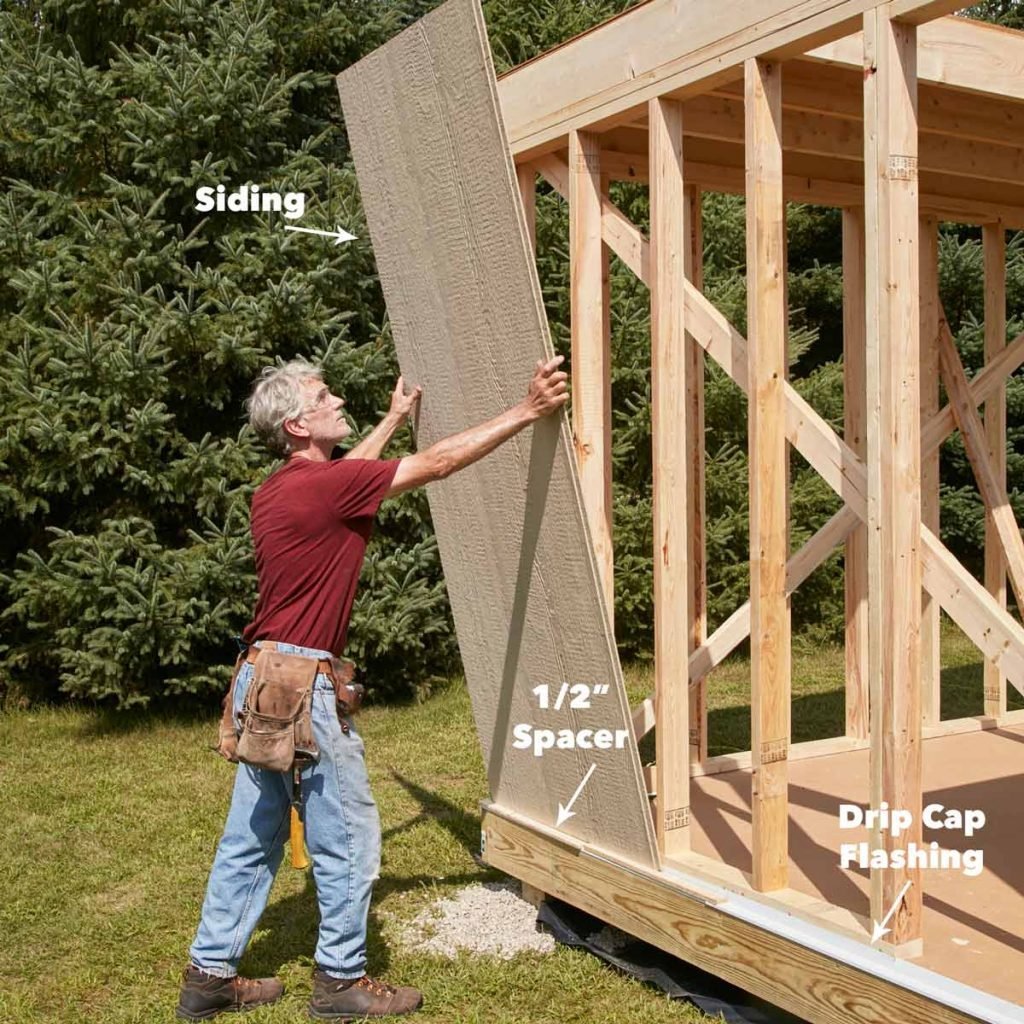
Double-check the corners and the front posts to make sure they’re plumb. Then cut and install the 4- x 8-ft. sheets of siding. Measure and cut the siding panels so that the seams align over wall studs. Rest the bottom of the panels on a temporary 1/2-in. spacer to provide space between the siding and the drip cap.
Nail the siding to the studs. Follow the siding manufacturer’s instructions for spacing and nailing the siding.
Remember to install metal drip cap flashing (visible in photo above) over the 2×8 skirt board before installing the siding.
10. Frame the Roof
 Family Handyman
Start by cutting the 2×8 ridge board to length and marking the rafter locations on both sides using Figure K as a guide. Also mark the rafter locations on the floor along both sides of the shed.
Next, set the ridge on temporary 2×4 posts and brace it with diagonal 2x4s (photo above). The top of the ridge should be 76 inches from the floor. Cut a pair of rafters (Figure J) and set them in place to test the fit. Make any needed adjustments.
When you have a pair of rafters that fit perfectly, mark one of them as a pattern. Use the pattern to trace the rafter cuts on the remaining 2x6s and cut out the rafters.
Stretch a string along the top of the ridge as a guide to keep the ridge straight as you install the pairs of rafters (photo above). The 2×4 blocks nailed to the floor between the rafters help position the rafters and make them easier to secure. Add the 2×6 subfascias before you install the four overhang rafters at the front and back of the shed.
11. Fill in the Gable Framing
 Family Handyman
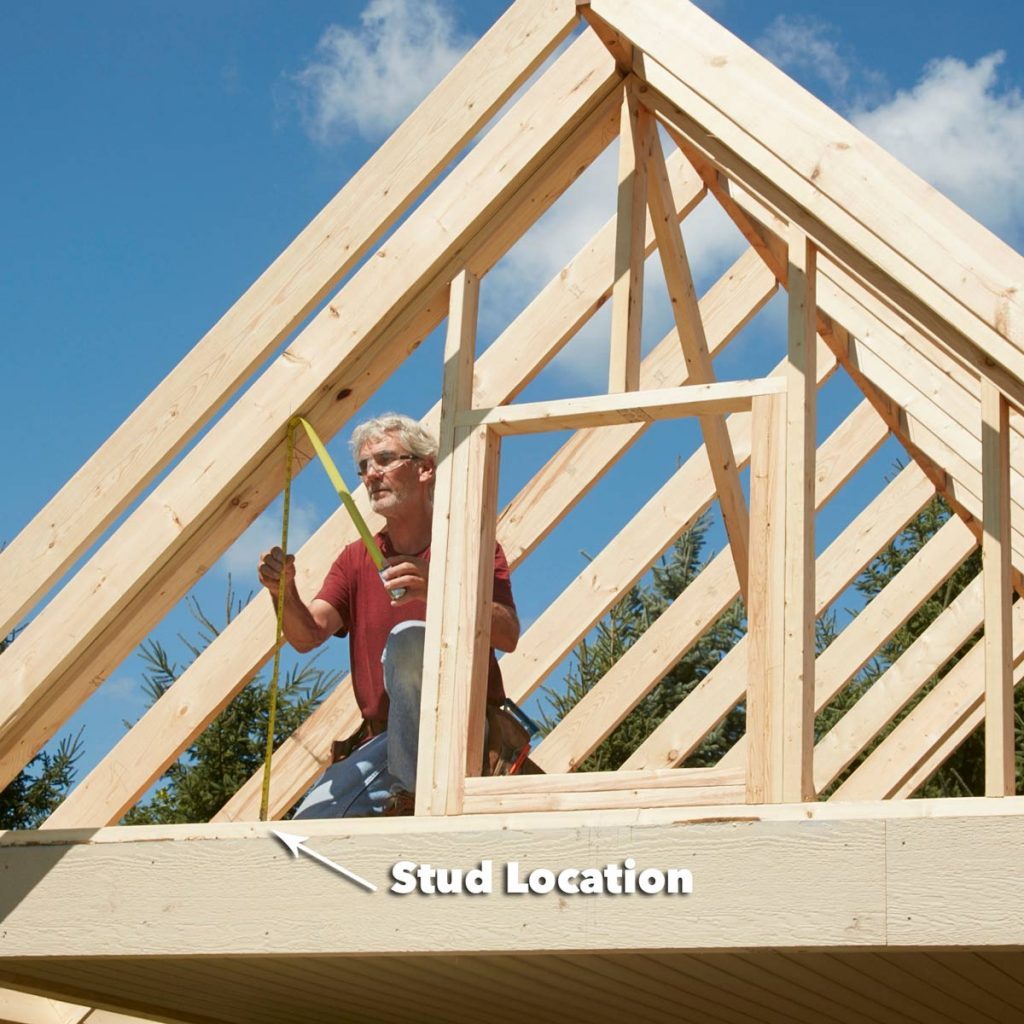
When you’ve finished the roof frame, build the front and back gable walls (Figure L). The front wall requires an opening for the gable-end window (photo above).
Mark the stud locations on the bottom plate. Then use a level to transfer the stud locations to the top plate. Measure to find the stud lengths.
12. Install the Sheathing
 Family Handyman
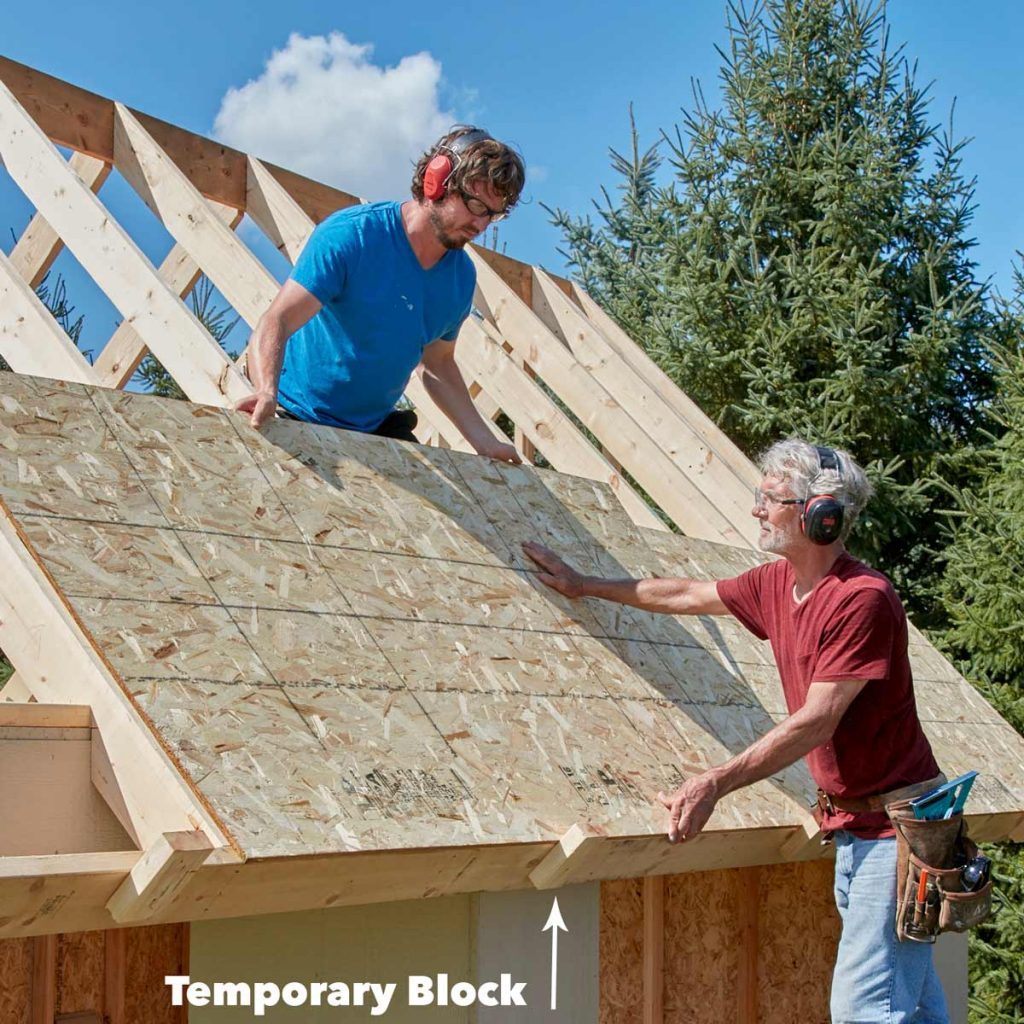
Finish the roof construction by covering the rafters with sheathing (see Figure N and photo above). Screw blocks to the subfascia to support the first row of roof sheathing while you nail it to the rafters. Space the sheathing about 1/8-in. between sheets to allow for expansion. Stagger the seams between rows.
13. Install the Soffit and Fascia
 Family Handyman
Start by nailing the soffit boards to the underside of the rafters. Then add the 1×8 fascia boards that cover the 2×6 subfascias and overhanging rafters. Finish the overhang trim by installing the 1×3 roof molding over the 1×8 fascias (photo above).
14. Build the False Beams
 Family Handyman
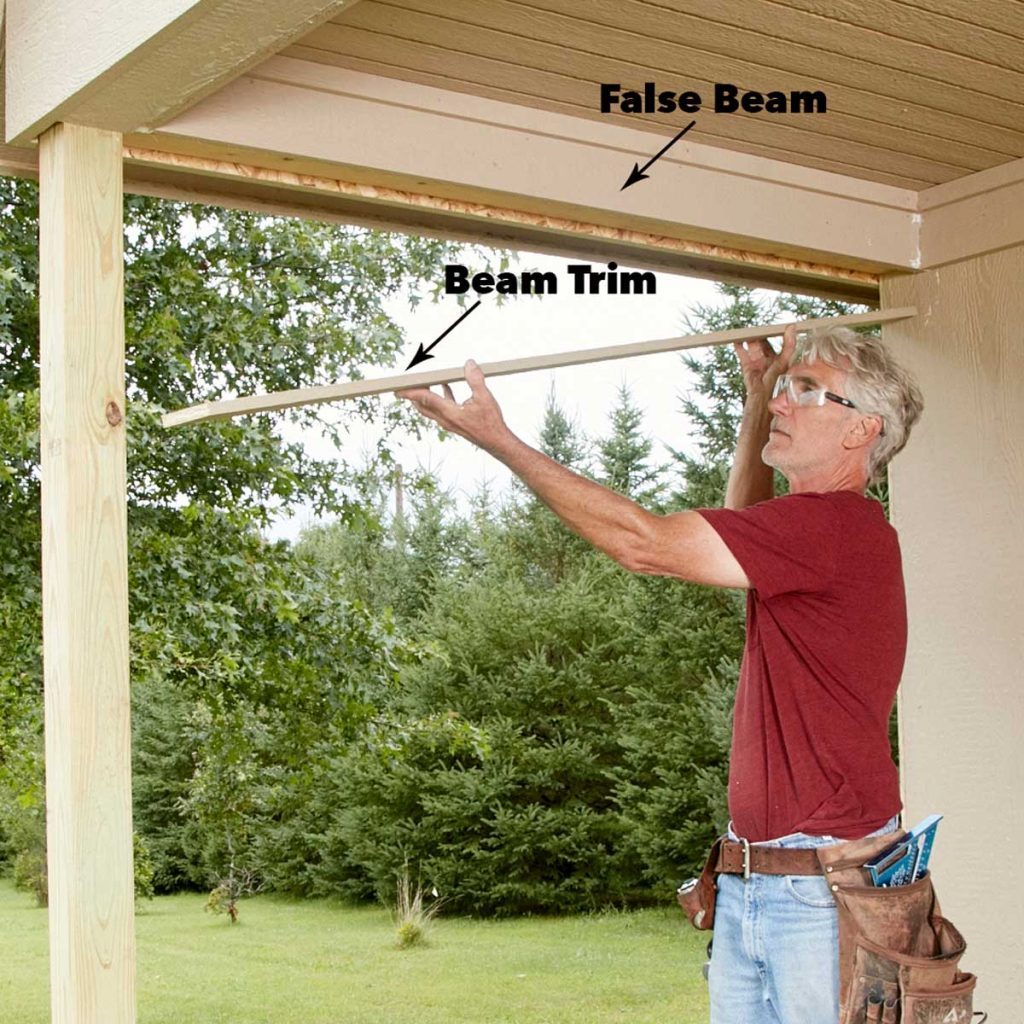
The next step is to install the 1-in. x 9-1/4-in. trim board that fits against the soffit and runs around the perimeter of the shed and porch. This wide trim board forms one side of the false beam that runs around the porch ceiling.
Add a 2×4 frame to the underside of the porch ceiling to create the false beam. Then nail the grooved panels to the porch ceiling and cover the 2×4 false beam with trim (photo above). You can install the corner boards at this stage, but the battens will have to wait until after you’ve built and installed the windows.
Figures S through V show details for the siding and trim installation.
15. Assemble the Windows
 Family Handyman
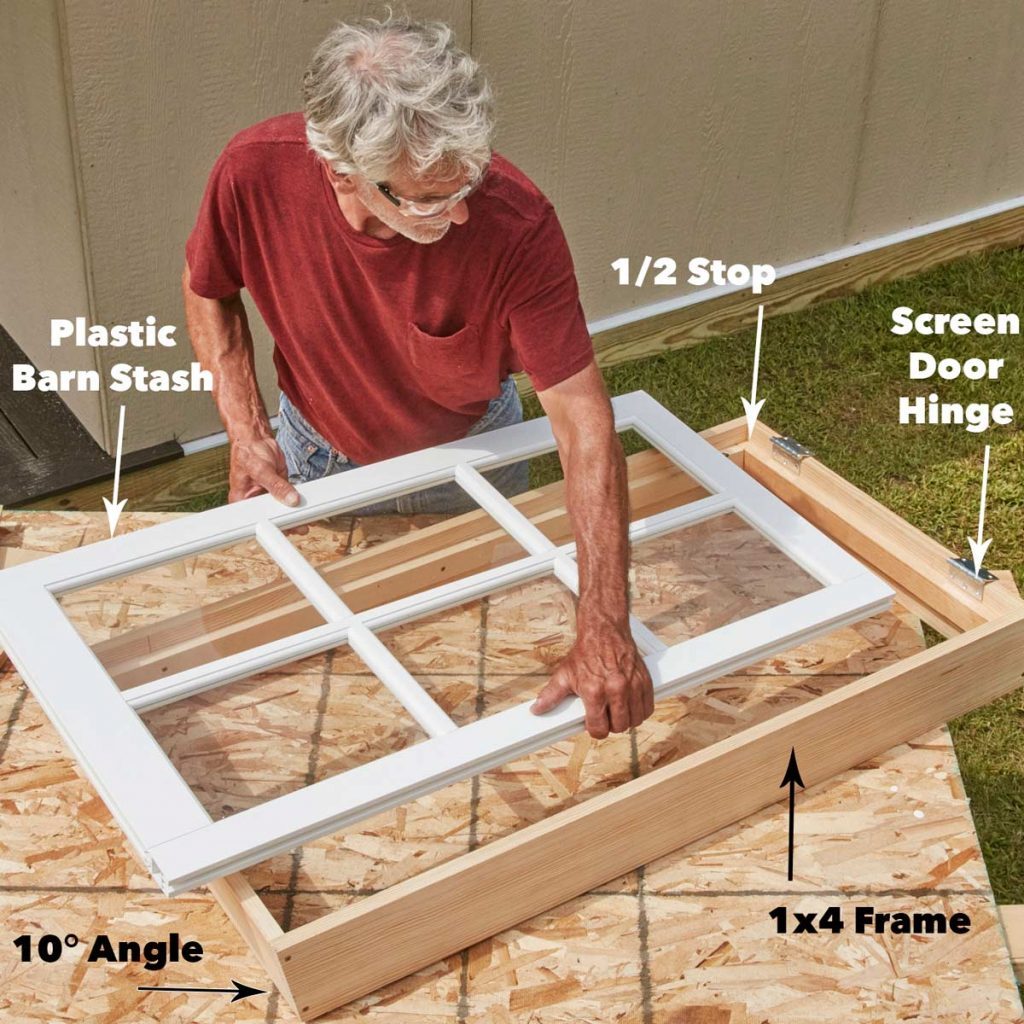
We built inexpensive windows for the shed with plastic barn sash mounted in 1×4 pine frames (photo above and Figures Q and R).
Start by measuring the sash and building a 1×4 frame that’s 1/4-in. wider and taller than the sash. Cut 10-degree angles on the bottom of the sides to provide a sloping sill. Cut 1×2 stops to fit in the frame and position them to hold the sash flush with the outside edge of the 1×4 frame.
Attach galvanized screen door hinges to the frame, set the sash in place and drill holes for the fasteners. Since the plastic isn’t strong enough to hold wood screws, we drilled holes through the sash and attached the hinges with machine screws, washers and nuts.
Read more : Indoor vs Outdoor Pickleballs: 5 Major Differences
Connect three windows to form the window assembly for the side wall (Figures R and U). Use a pair of 2x4s as spacers between each window. Screw through the window frames into the spacers to hold the windows together.
Tip the triple window assembly into the window opening. Shim under the windows until about 3/8-in. of the top frame is exposed on the outside. Shim between the studs and the window frame to level and plumb the window unit and to adjust the frame until there’s a consistent space between the window frame and the sash.
Make sure the window frames are flush to the siding. Then screw through the window frames into the studs to hold the windows in place. We added Stanley Storm Window Adjuster hardware to the windows to hold them open and to lock them.
16. Trim the Windows
 Family Handyman
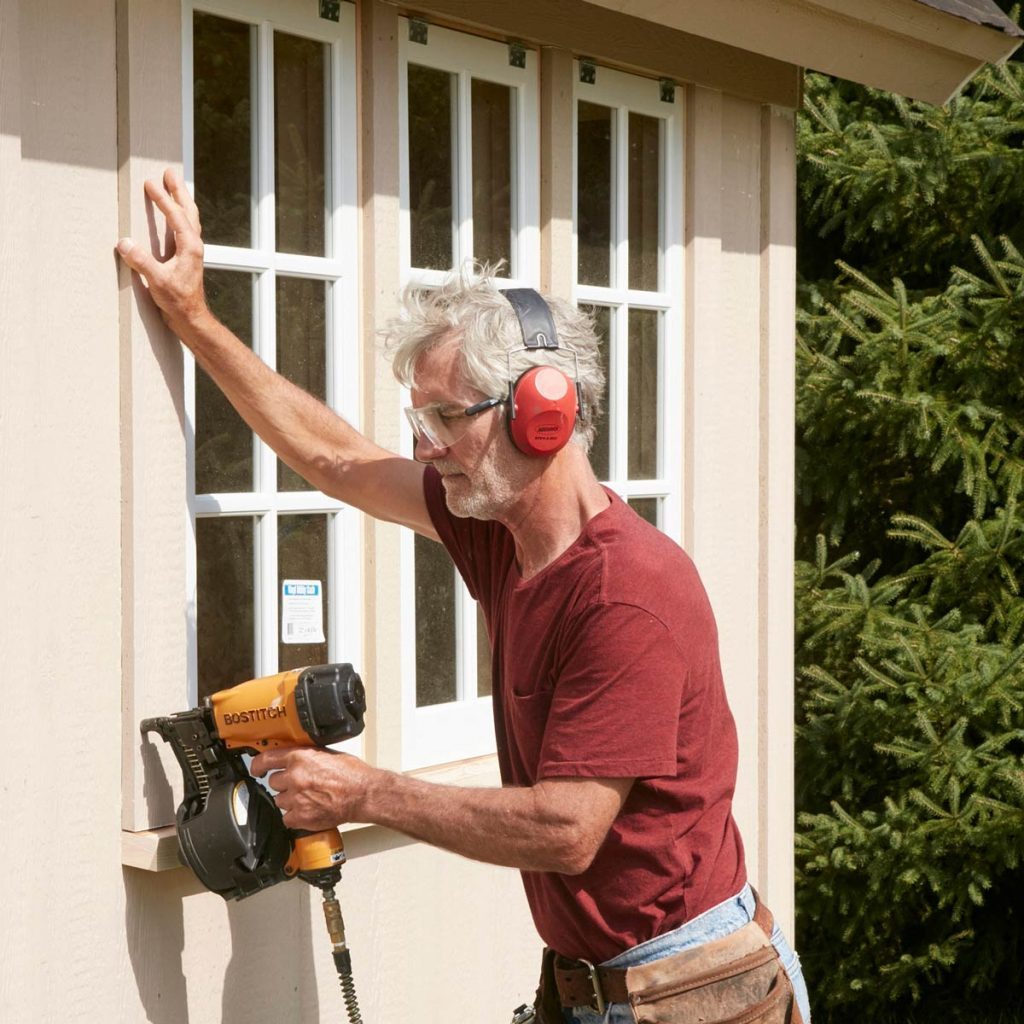
Rip a 2×4 to 2-in. wide with a 10-degree bevel on each side to form the sill piece. Cut the sill to extend 3-1/4-in. past the window frame on each end and attach it to the wall under the windows with long screws. Then cut and install the 1×4 trim pieces that fit between the top trim and the sill (photo above).
The front window is similar, except it’s smaller and contains only one sash. Use the same process to build and install the front window.
17. Install the Door and Finish the Trim
 Family Handyman
If your prehung door has exterior trim, pry it off. The wide trim board running around the shed, under the soffit, will take the place of the top door trim.
Place the door in the opening to check the fit. The top doorjamb should rest against the wide trim board. Use wooden or composite shims between the side jambs and the 2×4 framing to square the door frame. Place shims behind each hinge and at the top, middle and bottom of the latch side.
Adjust the shims until there’s an even space between the door and the doorjambs on the top and sides. Then drive screws through the doorjambs into the framing at the shim locations to secure the door.
Finish the door installation by adding 1×4 trim boards to each side. Finish the exterior trim by nailing 1×2 battens over the stud locations and installing the corner boards if you haven’t done so already.
18. Cover the Gables with Shakes
 Family Handyman
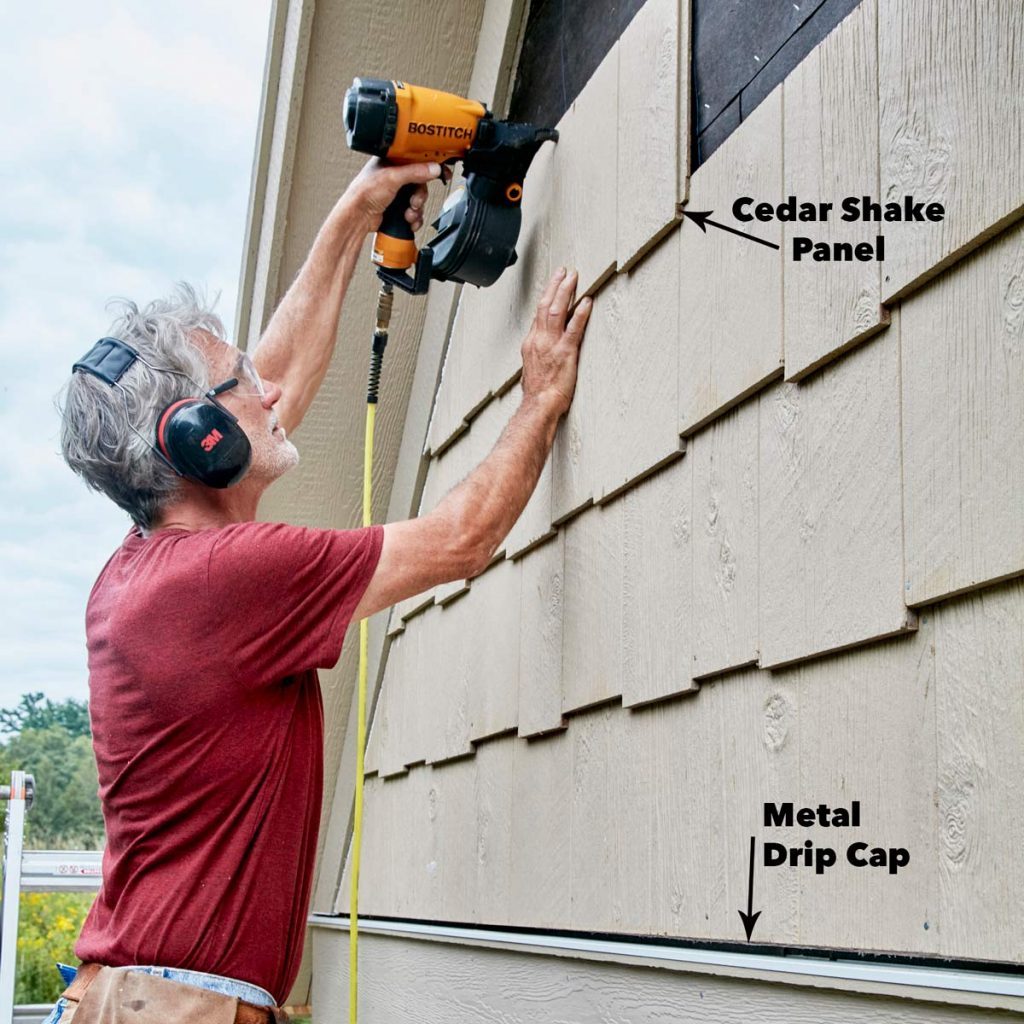
The front and back gable ends are covered with panels that resemble cedar shakes. After installing a metal drip cap over the 1×2 that caps the wide trim board, install the shakes according to the manufacturer’s instructions (photo above).
Follow the manufacturer’s instructions for details about panel placement and how much caulk space to leave between the panels and the trim.
19. Build the Bar
 Family Handyman
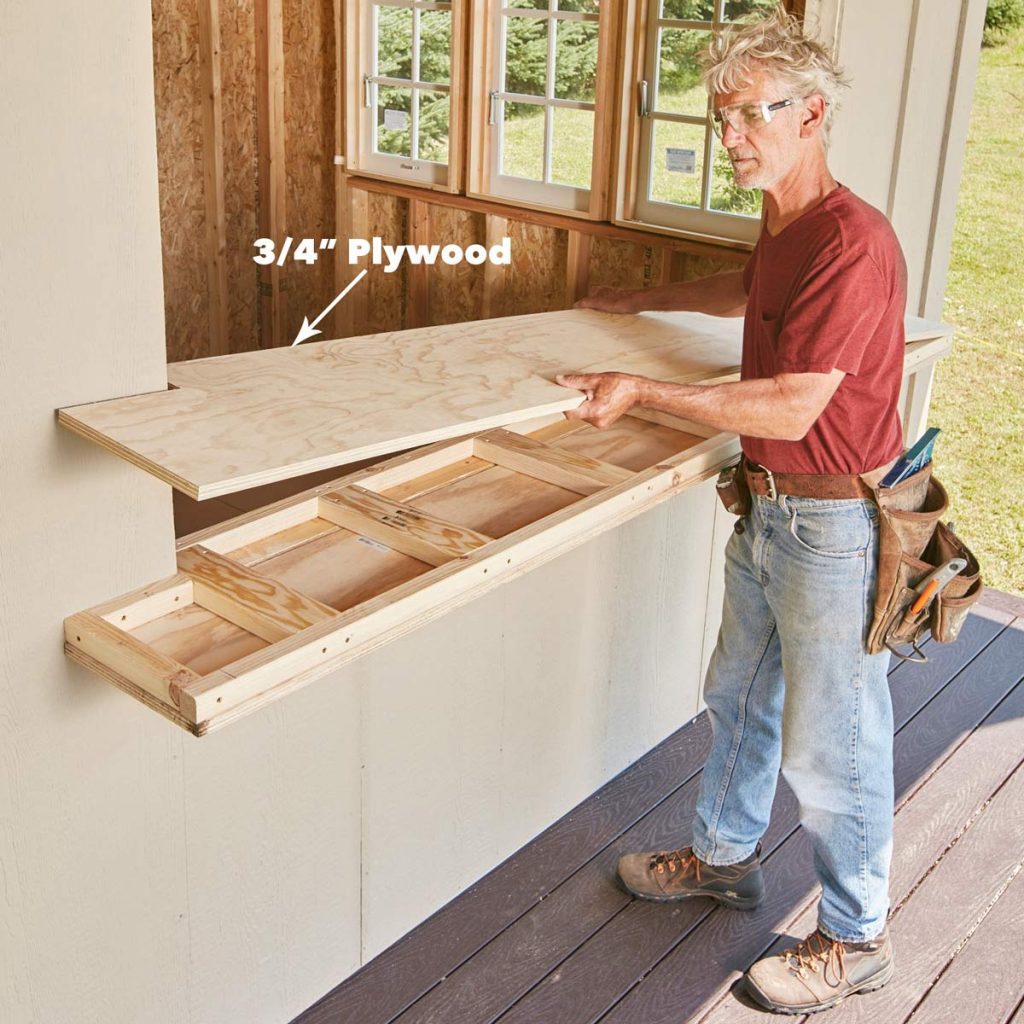
The bar consists of a frame of 2x2s and 2x4s covered on the top and bottom with plywood and finished with a wood edge (photo above and Figure P). For extra strength, use screws to attach the frame. Shim under the 2x4s if needed to level the bar top before installing the plywood.
When you’re done building the bar, add jambs to the sides and top and install exterior trim. Cut the jamb material to fit and nail the pieces to the sides and top of the bar opening. Then add 1×6 trim, mitered at the corners, to both sides of the bar opening to finish it off.
20. Assemble the Bar Door
 Family Handyman
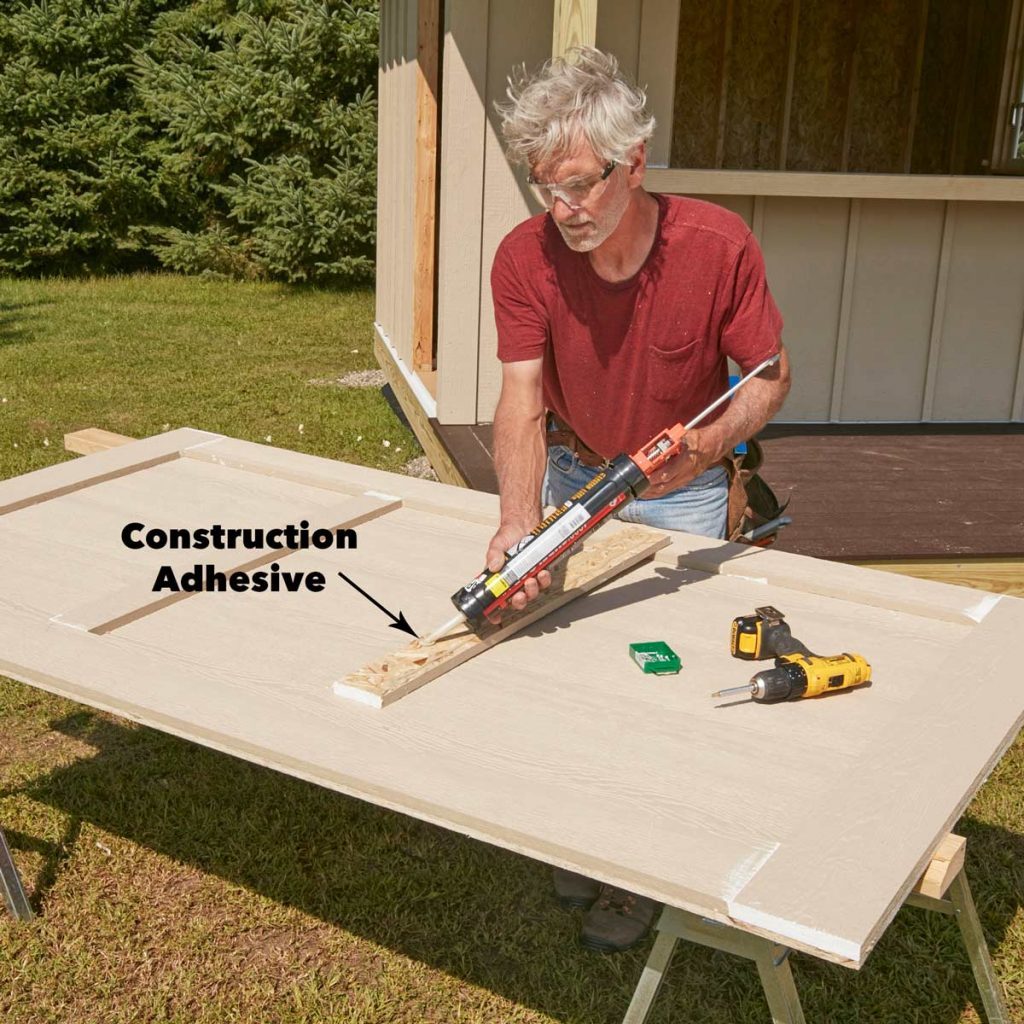
The bar door attaches to the inside of the shed with hinges and swings up to open. To build the door, simply cut a piece of siding material to the right size (Figure P). Glue and screw 1x6s and 1x4s to the siding to create the bar door (photo above and Figure P).
21. Mount the Bar Door
 Family Handyman
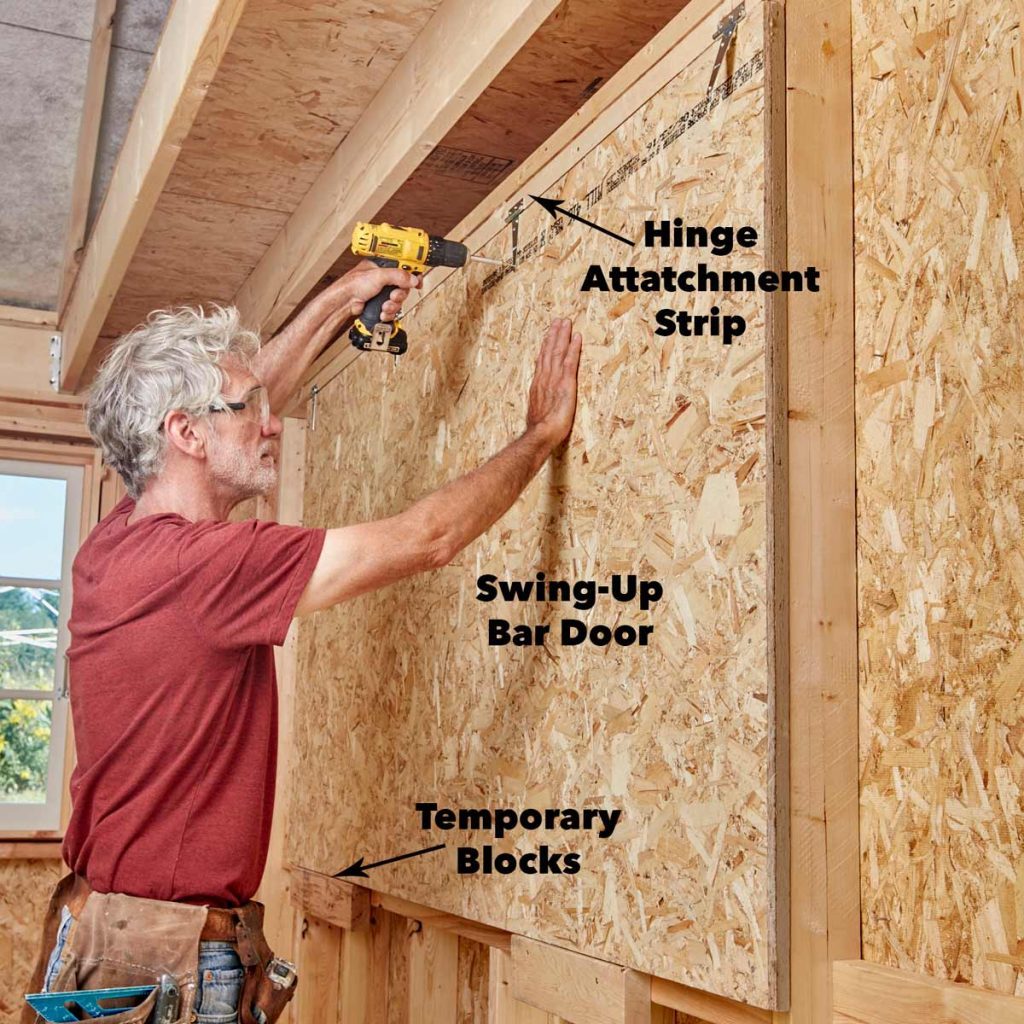
To install the bar door, rest it on blocks so that the bottom is 2-1/4-in. below the bar top. Add a 1-1/4-in.-thick strip of wood along the top of the door to provide a hinge attachment point. Then screw strap hinges to the wood strip and to the door (photo above). Remove the temporary support blocks when you’re done attaching the hinges.
We mounted a pair of locking hasps on the interior side of the bar door to secure it when it’s closed. Then we added eye bolts to the door edges and to the ceiling above the door to provide a way to hang the door when it’s open.
Finishing Up
 Family Handyman
Before you shingle the roof, install metal drip edge. Then nail a row of starter shingles along the bottom of the roof. Install the rest of the shingles according to the package instructions.
Before painting, we filled spaces on the exterior with acrylic caulk. Then we rolled and brushed two coats of top quality acrylic exterior paint onto the trim and siding. Now your pub shed is complete!
Want to learn how to build our annual sheds from previous years? Click here.
Project PDF Files
Click the links below to download the materials list as well as the drawings for this project.
- Project drawings and materials list: Double-Duty Pub Shed PDF.
- Louisiana-Pacific materials list.
Source: https://gardencourte.com
Categories: Outdoor

